Happy New Year! I know it's a little late but hey, I've been busy... Every holiday season, without fail, I'm always busy even though I plan way ahead. My biggest accomplishment of this past holiday season was managing to stay stress free. I don't know how this happened, oh wait, I do, I didn't host any major events at my house last holiday season and it was fantastic! I also managed to get all of my Christmas shopping done in November instead of December which was AWESOME!!! Now that NYE has passed and a new year begins I have some major goals I need to work on this year. No, not a new years resolution but a goal, and it's not lose weight or make more money in my job (but that would be cool) or find love (already have that one!), but to be settled. This year will be my first full year home with my husband. I can feel the eyebrows raising in confusion. Six months every 2 years I move close to 300 miles away from home for work and this year is my "off" year. So, I have a lot to get done before I leave again. Here are my top 10 goals for the year!
Sunday, January 5, 2014

Wednesday, December 18, 2013
Christmas is Almost Here!
Hi All!
Yes, it has been a while since I've posted and for some very legitimate reasons. First, my husband and I have been doing a bit of traveling. Secondly, I've been training for a half marathon which I was suppose to run a couple weekends ago but because of an awesome ice storm here in Texas it was cancelled... so I'm still training. Thirdly, family. While I see my families often through out the year, during the holiday season we get extra close and enjoy things like breakfast with Santa and touring the DeGoyer house at the Arboretum and so on... Fourthly, shopping!!! I was on a mission this year and I nearly succeeded! The goal: to have all of Christmas shopping done by December 1st. Everyone gets so wrapped up now a days shopping during December instead of really enjoying. Well this year I have really enjoyed December! Lastly, a very very good friend of mine who has had an "awesome" pregnancy, sense the sarcasm, delivered her beloved little boy late last week as an early Christmas present. I told her he really wanted to see Santa! That's a wrap up of my life from the past month and now Id love to share so fun things I've done around the house this Christmas season.
Yes, it has been a while since I've posted and for some very legitimate reasons. First, my husband and I have been doing a bit of traveling. Secondly, I've been training for a half marathon which I was suppose to run a couple weekends ago but because of an awesome ice storm here in Texas it was cancelled... so I'm still training. Thirdly, family. While I see my families often through out the year, during the holiday season we get extra close and enjoy things like breakfast with Santa and touring the DeGoyer house at the Arboretum and so on... Fourthly, shopping!!! I was on a mission this year and I nearly succeeded! The goal: to have all of Christmas shopping done by December 1st. Everyone gets so wrapped up now a days shopping during December instead of really enjoying. Well this year I have really enjoyed December! Lastly, a very very good friend of mine who has had an "awesome" pregnancy, sense the sarcasm, delivered her beloved little boy late last week as an early Christmas present. I told her he really wanted to see Santa! That's a wrap up of my life from the past month and now Id love to share so fun things I've done around the house this Christmas season.
Tuesday, November 19, 2013
Give Thanks
This week I have seen so many Christmas light crews going in and out of my neighborhood and everywhere. Like so many other people, I love this time of the year. Truly! Christmas carols start popping up in my head, I start present shopping along with so many other fun things. However, is Thanksgiving slowly being forgotten about? Besides the shopping centers that put up their Christmas stuff in early October, on a run around the neighborhood the other night I counted numerous houses that already had their Christmas lights turned on, garland around the doors and staircases and Christmas trees up! Did I miss something? Thanksgiving for me is a time to be with family and celebrate the fact that we have all that we have been blessed with and celebrate those blessings with one another. It is the beginning of a month of gratefulness and selflessness. Maybe it's just me, maybe I'm old school with my firm belief in nothing goes up till after Thanksgiving. Anyway, rant done!
Monday, November 4, 2013
Pumpkin Spice Cupcakes
I'm afraid to jinx it but I'll say it anyway, it's finally starting to feel like fall here in Texas! The leaves are starting to turn their beautiful fall colors and slowly starting to fall off the trees. It's not cold enough to turn on the heat but it's definitely cool enough to turn on the fire and get nice and warm in the evenings. I can't believe it's already November; I wish time would slow down just a little bit so that I could enjoy the seasons a little bit more (mainly fall). Like many of you bakers, I love pumpkin during this season but it's been a little hard for me to get into this year because its been so warm. There is one pumpkin thing I always jump on early and that's my pumpkin spice coffee creamer. The second I see it out in stores I make a purchase. Later this week I'm going to attempt to make my own but we'll see what happens. Anyway, one of my favorite fall deserts to make are these pumpkin spice cupcakes with vanilla cream cheese frosting. They are seriously amazing! I've had the recipe for a few years now and for the life of me I can't figure out where I found it but I just had to share the amazing-ness of this yummy treat!


What You'll Need:
1 c. all purpose flour
1 tsp. baking powder
1/2 tsp. baking soda
1/4 tsp. salt
1 tsp. cinnamon
1/2 tsp. ground ginger
1/2 tsp. ground all spice
1/4 tsp. nutmeg
1 c. pumpkin puree
1 c. sugar
1/2 c vegetable oil
2 large eggs
1 tsp. pure vanilla extract
1/2 cup chopped pecans (optional)
What to Do:
1. In a large bowl, whisk, pumpkin, sugar, oil, eggs and vanilla.
2. Add the flour, baking powder, baking soda, salt and spices one at a time, whisking between each addition until completely combine.
3. Stir in nuts.
4. Fill cupcake cups 3/4 full and bake at 350 (f) degrees for 22- 24 minutes.
For the Icing:
1/2 c. butter , at room temperature
8 oz. cream cheese, at room temperature
1 teaspoon pure vanilla extract
4 c powdered confectioners sugar
1tbsp heavy cream, whipping cream or milk (whatever you have on hand)
What to Do:
1. In a mixer, beat butter till creamy.
2. Add cream cheese to butter and beat until combined.
3. Add vanilla extract. Beat.
4. Add powdered sugar one cup at a time on medium speed until the icing begins to get fluffy.
5. Add heavy cream, whipping cream, or milk. Beat till combined.
6. Use immediately or put in refrigerator till ready to use.
Friday, November 1, 2013
Fitness Friday #2

On occasion when I don't feel like doing a full work out or even leaving the house, I pull up an awesome free website I found for yoga called yogadownload . After seeing all that candy and thinking about all the sugar in the kids bags I felt as though i needed to do a little something before I went to bed. This website has several free yoga workout videos you can follow as well as some that you pay for. During my busy season for work this was a great resource for me to calm down after a long day and bring my blood pressure and sanity levels back down to normal. While I really like this website and it says beginner on several videos, if you've never done yoga before I'd suggest going to a couple of classes and learning the basics so that you can listen to the video to follow along instead of watching the video.
I hope you all have a fabulous first day of November!
Namaste
Disclaimer: The thoughts and opinions are my own and not solicited from the above reviewed.
Tuesday, October 29, 2013
How to be nice during Halloween
Awhile back I may have mentioned to you that I had to create a list by week for projects I wanted to complete this fall season. This past week I found myself making one that I wasn't planning on making. However, I love it! I have started to get more excited about Halloween, not only because it is the kick off to my favorite two months of the year, but because it seems that everyone else is getting excited about it too. Unfortunately for me, I believe there is an age and time limit. Last year around 8:30 we had a knock on our door and saw that it was a group of teenagers coming around for candy. Number 1, it's 8:30 on a week night, I'm preparing for the next day, thus, among other reasons, why parents bring their kids around early. Number 2, if you can drive a car, you're to old to be trick or treating. I know some people believe that is too old but that is pretty much my age limit. So, at 8 o'clock this year, I'll be putting up my handy dandy little sign.

What you'll need:
Wood Plaque (can be found at crafts stores)
sand paper (optional)
craft paint
paint brush
hot glue gun
ribbon
2 eye hooks
letter stickers
decorations (optional)
How to make it:
1. Usually wood plaques are sanded down nicely and don't need any extra sanding. Take a look at your edges and see if yours needs any extra sanding for smoothness.
2. Paint your plaque. If you're using a color combo like mine, it's important to paint your outer edges first and top with the black after.


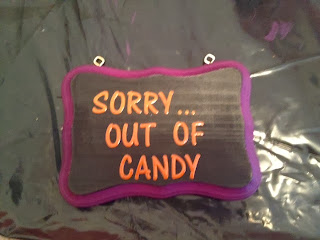


7. So that edges don't hang over once the ribbon is glued together, cut ribbon as shown above. Glue together.

8. Add a little extra flare to your sign by adding some scrapbook stickers or a witches hat to the corner.

What you'll need:
Wood Plaque (can be found at crafts stores)
sand paper (optional)
craft paint
paint brush
hot glue gun
ribbon
2 eye hooks
letter stickers
decorations (optional)
How to make it:
1. Usually wood plaques are sanded down nicely and don't need any extra sanding. Take a look at your edges and see if yours needs any extra sanding for smoothness.
2. Paint your plaque. If you're using a color combo like mine, it's important to paint your outer edges first and top with the black after.

3. Add your eye hooks. I used small ones that I was able to screw in by hand.
4. If you don't have a fancy machine or great hand writing to make those perfect letters, letter stickers are a great option. Cut out your stickers and make sure they fit the way you want on your plaque. Place letters on your plaque.


5. I decided mine needed a little something after sorry so using a fine tip brush and a little orange paint I added three dots.

6. Run your ribbon through your eye hook.


8. Add a little extra flare to your sign by adding some scrapbook stickers or a witches hat to the corner.
Sunday, October 27, 2013
Veggie Loaded Mac & Cheese
It's squash season! A couple of years ago I was intimidated
by these yummy things. It seemed so daunting to cook them much less figure out
what to cook them with. Intimidated no more my squashy friend! I love finding
ways to cook healthier versions of our favorite dishes. It's also great when
its budget friendly! This week I've been playing with my friend, butternut
squash, and we have come up with some fabulous yummy dishes!

1/2 cup broccoli florets
12 ounces whole wheat mini pasta
1 cup skim milk
1 1/4 cup freshly shredded Parmesan
1 1/2 cup reduced fat sharp cheddar cheese, shredded
1 cup butternut squash puree (don't feel like making it? It's in the freezer isle) (see notes)
1 teaspoon salt plus some for seasoning chicken
1 teaspoon dry mustard
1/2 teaspoon pepper plus some for seasoning chicken
1/2 teaspoon Worcestershire sauce
1/2 tsp chili powder
2 tablespoons whole wheat bread crumbs
Reduced fat Monterey jack cheese, shredded
Directions:
Notes: For a quick and easy butternut squash
puree, see my recipe here.
Have any of yall seen the Bethenny show, hosted by Bethenny
Frankle from the Real House Wives of New York? If you haven’t, she started out
as a healthy food chef and has now made part of this a segment on her show. Last
week she made a "healthy" mac & cheese. WINNER, one of the
hubby's favorite dishes! Check it out here. This, of course, made me start thinking
about what can I do to jazz it up just a smidge more and make it into a meal.
Here is my version of a healthy mac & cheese…

Ingredients:
5 chicken tenders
1/2 cup bell pepper
(whatever you have works)1/2 cup broccoli florets
12 ounces whole wheat mini pasta
1 cup skim milk
1 1/4 cup freshly shredded Parmesan
1 1/2 cup reduced fat sharp cheddar cheese, shredded
1 cup butternut squash puree (don't feel like making it? It's in the freezer isle) (see notes)
1 teaspoon salt plus some for seasoning chicken
1 teaspoon dry mustard
1/2 teaspoon pepper plus some for seasoning chicken
1/2 teaspoon Worcestershire sauce
1/2 tsp chili powder
2 tablespoons whole wheat bread crumbs
Reduced fat Monterey jack cheese, shredded
Directions:
1.
Preheat the oven to 350 degrees. On a baking pan
lined with foil, lay out chicken tenders and salt and pepper on the top. Cook
in the oven for about 10 minutes or until cooked.
2.
Boil
pasta shells in salted water until slightly firm, according to package
directions. Once cooked, drain and blanch broccoli florets in the water. Once
they turn a bright green they will be cooked. Remove pan from heat, drain and
splash broccoli with cool water. Return both pasta and broccoli to the pan
3.
In another saucepan, combine the skim milk,
Parmesan, cheddar, and butternut squash puree over medium heat until melted and
combined. Turn off the heat. Add salt, mustard, pepper, Worcestershire sauce,
and chili powder.
4.
Using two forks, shred chicken to desired size.
5.
Add cheese
sauce, chicken and bell peppers to the pasta and broccoli. Mix together well.
6.
Spray a shallow baking pan with cooking spray
and put the pasta-cheese mixture in it. Sprinkle with breadcrumbs and Monterey
jack cheese. Bake for 15 to 20 minutes.
Saturday, October 26, 2013
Squishy Squash
You’re probably thinking 'woohoo butternut squash puree…who
cares', right? Well my friend, until you discover the rich, creamy, butter-y-ness
this baby has to offer, I suggest you don't knock it till you try it! After
looking at a couple of recipes on how "chefs" make it and noticing it
took an hour to make I realized a) oh yea, you technically have and hour to
make it since this is your job and b) what normal person has 1 hour available to
make a puree? Not me! Off on my lonesome I went on a journey to find something
suitable for the modern everyday women/ man. Here's what I found…


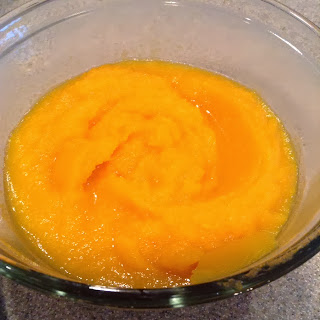
P.S. This is freezer friendly recipe if you decided
to make it in bulk.
P.S.S. Adding a little cinnamon, nutmeg and butter would make this a lovely side dish.

1.
Peel your squash and cut it down the center.
Clean out its guts. Depending on the size (I usually get the smallest one I can
find) and how much you need, generally half of a squash will be sufficient for
puree. Save the rest for a yummy side dish!

2.
Cube your squash into about 1 inch cubes or
something that will fit in your blender or food processor.
3.
Place your squash in a blender or food processor
and chop/ puree. Using the puree button on my blender very finely shredded by
squash (see below).

4. In a skillet on medium heat, cook your squash with roughly 3/4 cups of water this should take 5- 10 minutes. Cover with a lid and stir occasionally. Use your judgment on how much water the squash needs. Your squash is cooked when it starts getting a mushy texture.

5.
Return Squash to blender/ processor and puree until there are no more chunks. There you have it, butternut squash puree in under 20 minutes!

P.S.S. Adding a little cinnamon, nutmeg and butter would make this a lovely side dish.
Friday, October 18, 2013
Fitness Friday
Welcome to Fitness Fridays! If you've read my 'about me'
page I let you know that I'm an avid outdoor runner. I hate going to the gym
where I feel like people are judging me and truly, I don't have time to go to
the gym. Fitness research seems to fascinate me as I do my best to lead a
healthy life style. My goal for this new addition to my blog is to inspire
women and their family to go out and be fit in fun quick ways. Many of my
friends are new mommies or getting ready to be a new mommy which leaves them
even less time to take care of themselves. I will do my best to keep helpful
work out tips to a maximum of 15 minutes total even though the recommended
daily amount of exercises is a 30 minutes, but we'll get to that later!

In my own house I have my own
room for whatever I want. It's a multi purpose room that I have set up for
crafts but mostly excersise. In our apartment I took over a corner in our
living room. Over time I have made an investment onto work equipment for my own
room. Note the word INVESTMENT! I do not own any machines but instead I have 1
set of 5 lbs dumbells, 1 set of 10lbs dumbells, 1 8lbs kettlebell, a set of
resistance bands, a pullup bar, a stability ball, a 5lbs medicine ball and a
yoga mat. I bought all of this over
time.
How many of you have one of
those stability balls you purchased way back when? When is the last time you
actually used your stability ball? A few months ago I purchased my own
stability ball . I always loved sitting on my moms whenever I would go over to
her house. Unbeknownst me I was actually doing a very lite core exersize when
sitting on it. This past week I was feeling like I needed to do a little bit more
core work and I really wanted to incorporate my stability ball, so off I went
googling and pinterest-ing to see what I could find. I needed something I could
do in between comercial breaks of my weekly TV shows and that’s exactly what I found! See the
exercises from Pop Sugar contributer Susi May below or click here to go to the
Pop Sugar webpage .

Keep reading for more
details.
After warming up with
light cardio for five minutes, work your way through this series of six
exercises. Repeat entire workout two to three times.
1. Plank
Place your hands on the floor and your shins on the ball, coming into a push-up position with your shoulders directly under your hands. Hold for 30 seconds. Increase the difficulty by adding 10 push-ups after your plank. Repeat three times.
Place your hands on the floor and your shins on the ball, coming into a push-up position with your shoulders directly under your hands. Hold for 30 seconds. Increase the difficulty by adding 10 push-ups after your plank. Repeat three times.
2. Knee-Tuck Crunch
Start in a plank position with the tops of your feet on the ball. Pull your knees to your hands, rounding your spine by engaging your abs. Lengthen back to starting position. Do 10 reps.
Start in a plank position with the tops of your feet on the ball. Pull your knees to your hands, rounding your spine by engaging your abs. Lengthen back to starting position. Do 10 reps.
3. Classic Crunches
Begin sitting on the ball, and walk your feet out until your rib cage is on the ball. Squeeze your glutes to keep your pelvis in line with your shoulders. Interlace your fingers, and place them behind your head for support. Exhale, pulling your abs to your spine and pressing the rib cage into the ball to lift your head. Lower head, and repeat for 20 reps.
Begin sitting on the ball, and walk your feet out until your rib cage is on the ball. Squeeze your glutes to keep your pelvis in line with your shoulders. Interlace your fingers, and place them behind your head for support. Exhale, pulling your abs to your spine and pressing the rib cage into the ball to lift your head. Lower head, and repeat for 20 reps.
4. Inner-Thigh
Squeeze
Lie on your side, and place the exercise ball between your feet. Slowly lift the ball up toward the ceiling, working your inner thighs and hips. Do 15 reps.
Lie on your side, and place the exercise ball between your feet. Slowly lift the ball up toward the ceiling, working your inner thighs and hips. Do 15 reps.
5. Hamstring Curl
Lie on your back with an exercise ball under your heels. Lift your hips up, and keep them up as you slowly bend your knees, rolling the ball toward you and bringing the soles of your feet onto the top of the ball. Return legs to straightened position. Do 15 reps.
Lie on your back with an exercise ball under your heels. Lift your hips up, and keep them up as you slowly bend your knees, rolling the ball toward you and bringing the soles of your feet onto the top of the ball. Return legs to straightened position. Do 15 reps.
6. Ball Pass
Lie on your back, holding the ball with straight arms lifted toward the ceiling; raise your leg toward the ceiling too. Keep your lower back pressed into the floor as you lower the ball toward your head and your legs toward the floor. Return to starting position, and switch the ball so you're holding it with your feet. Lower your feet to the floor, reaching your arms overhead. Return to starting position. Do 10 reps.
Lie on your back, holding the ball with straight arms lifted toward the ceiling; raise your leg toward the ceiling too. Keep your lower back pressed into the floor as you lower the ball toward your head and your legs toward the floor. Return to starting position, and switch the ball so you're holding it with your feet. Lower your feet to the floor, reaching your arms overhead. Return to starting position. Do 10 reps.
Thursday, October 17, 2013
Money Matters Thursday
It's Thursday! Yay! I would like to start a new segment
today on ways to save money. Did you realize that Christmas is only 10 weeks
away? Seriously?! I've barely had time to take in my Texas fall weather. This
time of year I know a lot of people try to cut back so that they can save up to
pay for those awesome Christmas/Hanukkah/ whatever reason you're purchasing
gifts. I happen to also have 3 little nephews birthdays in the next two months
and whatever else decides to show up on my calendar that I've forgotten about…joy.


The first month was pretty much a wash as I went out and bought another reusable filter so I had 2 and some coffee grinds. At the time I didn't realize that places like TJ MAXX and Marshalls had packages of 2 for around $5. I bought 2 for a reason because I have a tendency to leave the pod in the keurig and this way I have one for the next day. It's one extra step but over time I know it will be well worth it! Not to mention it's also "greener" since we aren't throwing these away any more. By the time the holidays roll around I'll have a little extra cash to spend on gifts.
Disclaimer: I am in no way being paid to write or review about Keurig or Keurig products. This post is solely my opinion on products I purchased.
I think this post collection will also help me think of more
creative ways to save a dime and hopefully help you!
Addicted to Coffee
I am blessed with the luxury of working from home 80% of the
time. While I have a morning "schedule", it certainly isn't a typical
one. The first thing I do when I get up is turn on my Keurig and wish that it
would warm up faster. In the mean time I put away dishes that dried overnight and as
soon as I hear the Keurig's warm up wind down I head over and get the show
rolling.

I could make it as simple as popping a pod in and hitting
brew but a little over a month ago I had a small epiphany. While I am fully
aware that buying a box of pods at the grocery store is still cheaper than getting
a cup of coffee at coffee shop, I can still do better. With 2 coffee drinkers
in the house, averaging 1 cup of coffee a day, equals roughly 60 coffee pods a
month. That’s a lot. Yes, I use to use
coupons and at the very minimum I would pay $30 month. If I literally spend
only $30 a month on coffee that $390 annually. I'm sure some of you at this
point think I'm nuts but look, if I can spend half of that on a yearly basis that’s
almost $200 back in my pocket. I have dreams of traveling the world!
The first month was pretty much a wash as I went out and bought another reusable filter so I had 2 and some coffee grinds. At the time I didn't realize that places like TJ MAXX and Marshalls had packages of 2 for around $5. I bought 2 for a reason because I have a tendency to leave the pod in the keurig and this way I have one for the next day. It's one extra step but over time I know it will be well worth it! Not to mention it's also "greener" since we aren't throwing these away any more. By the time the holidays roll around I'll have a little extra cash to spend on gifts.
Disclaimer: I am in no way being paid to write or review about Keurig or Keurig products. This post is solely my opinion on products I purchased.
Wednesday, October 9, 2013
Easy Hearty Sloppy Joe's
In my house, we try to get creative for weeknight dinners to try and keep it interesting. When we know we're making something yummy, we're less inclined to crave easy takeout. Once again, this is a great recipe to hide veggies in for those picky vegetable eaters I know a lot of us have in our home. While Ive tried some finely diced red and green bell pepper and a couple of other veggies, I've been wanting to add in some fresh corn! Now before I make myself any more hungry right before we're ready for dinner, I'm going to get this typed up for you and your families.


Hearty Weeknight Sloppy Joe's
Makes 4 filled sandwiches
1 tbsp Vegetable Oil
1 small Onion, chopped
1 lbs. Ground Beef
1/2 lbs. Ground Turkey (optional)
3 tbsp Tomato Paste
1/2 cup BBQ Sauce
1/4 cup Ketchup
2 tbsp Worcestershire Sauce
2 tbsp Soy Sauce
Any Add in Veggies
Salt & Pepper
Sandwich Rolls
1. Heat Oil in a large skillet over medium heat. Add onions and cook, stirring till they turn translucent. Add beef and ground turkey to skillet, stirring and breaking up till crumbled. Once cooked, drain excess liquid.
2. Stir in tomato paste, BBQ sauce, ketchup, Worcestershire, soy sauce, pepper and salt to the skillet and mix well with meat and onion mixture. Let cook until sauce is slightly thickened.
3. Top your sandwich bun with your desired amount meat and top with extra goodies till your heart's content!
Tuesday, October 8, 2013
It just needed a facelift....
A few months ago I was over at my mother-in-laws house shuffling through some stuff with her in the garage. She has a lot of stuff and at the time she had more stuff in her garage because my sister-in-law, her husband and 3 babies were living with her while their house was being built. It's always fun going over there to see what's new and what creative project she's currently working on. While we finished up searching for whatever we were searching for in the garage that day she pointed to 2 lamps she had sitting on the golf cart and asked it I wanted them. I knew exactly where they would go but knew they were not going there in the condition they were in, not that they were bad just not my style. Spray paint has become my friend! With a little love and creativity I re-vamped these beauties to work perfectly in my decoration deprived bedroom.
Thursday, October 3, 2013
DIY Halloween Wreath
I use to not really care about Halloween. Honestly, why would I? I'm to old to go trick or treating, don't have any kids and until we moved into our neighborhood I use to roll my eyes at those crazy apartment neighbors who would decorate for the ghoulish occasion. However, last October that all changed and I couldn't wait for the kids to come by our new home and pass out candy. Not surprisingly, I completely over bought and over paid for candy (this year, hello dollar store!), didn't realize that you should turn your outdoor lights on or even better, just stand outside, and definitely didn't have anything fun and friendly to show my "holiday" spirit. This year I'm actually going to add some Halloween decorations to my yearly fall decor and I'm very excited to post my first craft to my blog!


Halloween Wreath

I will say while it's a decent picture of the wreath, It's so much better in person!
What You'll Need:
Grapevine Twig Wreath
Black Spray Paint
Glitter Spray Paint (optional)
Hot Glue Gun
Spooky Little Trinkets for Your Wreath
Step 1: Find a grapevine twig wreath. I found mine at JoAnn's for regular price $12 (always use a coupon to make it cheaper!)

Step 2: I laid some old newspaper down to prepare for spray painting. Using a flat black spray paint, paint the wreath from several different angles to make sure its completely covered and let dry.

Step 3: Using Krylon's Glitter Blast Starry Night (JoAnn's), spray a light layer of glitter to give it a fun 3-dimensional look.

Step 4: Once completely dry, first glue on your words and secondly your spiders (hobby lobby). On the off chance that your trinkets have picks on the, as if to put in floral arrangements, use a pair of pliers to gently pull off, or if needed, cut off.

Step 5: Add a hook to display your wreath for all to see!

Thursday, September 26, 2013
Cleaning Out Summer
The summer decor is down and the fall is going up. Not only do I love cooking for the seasons but I LOVE decorating. Now that my husband and I are fairly settled into our home of one year and all the big immediate decorating is done, not to say there aren't small touches needed here and there, but I finally feel like I can take up seasonal decorating project. I love going through magazines like Pottery Barn and Southern Living to see their decorating styles for the seasons. In fact, I have a large stack of magazine pages on my desk full of projects I'd like to do for the fall season and around the house in general. I realized that there was no way to physically, and for my husbands sake, financially going to be able to get them all done so I decided to make a fall project list, one each week till the end of fall and the rest will get filed away to potentially be done next season. The changing of the seasons also triggers a pantry, fridge and freezer clean out. My recipes this week are simple and great for a week night meal. One of them is a perfect example of how I also like to hide vegetables from my husband and trick him into eating them but shhh... don't tell him!
Red Pepper & Herb Chicken Strips
 I like doing several variations of chicken strip and using ingredients that sound good to me at that time. This time we used:
-2 strips of chicken per person (you can cut chicken breasts if you don't have strips) I used 4.
-1/2 cup flour
-1 egg, beaten
-3/4 cup panko
-1 tbsp red pepper flakes
-1/2 tsp thyme
-1/2 tsp cumin
-1/2 tsp oregano
-salt and pepper
-2 tbsp olive oil
Serve with a side sauce
1. Wash and pat dry chicken strips.
2. Put 1/2 cup flour in a bowl, beaten egg is a separate bowl and in another bowl mix together panko and the next 6 ingredients. Set up your assembly line in this order.
3. In a skillet heat 2 tbsp olive oil on medium heat.
4. Now that everything is in order, one at a time coat your chicken in flour, then the egg, and lastly the panko mixture. With the panko mixture use your fork to generously cover the chicken and press firmly, flip and do the same thing on the other side. Place your chicken one at a time in the skillet and cook each side until it's a deep golden brown.
 Summer Squash & Cheese Orzo
Red Pepper & Herb Chicken Strips

-2 strips of chicken per person (you can cut chicken breasts if you don't have strips) I used 4.
-1/2 cup flour
-1 egg, beaten
-3/4 cup panko
-1 tbsp red pepper flakes
-1/2 tsp thyme
-1/2 tsp cumin
-1/2 tsp oregano
-salt and pepper
-2 tbsp olive oil
Serve with a side sauce
1. Wash and pat dry chicken strips.
2. Put 1/2 cup flour in a bowl, beaten egg is a separate bowl and in another bowl mix together panko and the next 6 ingredients. Set up your assembly line in this order.
3. In a skillet heat 2 tbsp olive oil on medium heat.
4. Now that everything is in order, one at a time coat your chicken in flour, then the egg, and lastly the panko mixture. With the panko mixture use your fork to generously cover the chicken and press firmly, flip and do the same thing on the other side. Place your chicken one at a time in the skillet and cook each side until it's a deep golden brown.
 Summer Squash & Cheese Orzo
A fresh take on mac-and-cheese
Serving Size: 2
1 cup orzo
3/4 cup summer squash, diced
1/4 cup Cheddar cheese, grated
1 tbsp Parmesan cheese, grated
1/2 tbsp butter
1/4 cup milk
1/2 tbsp parsley flakes
salt and pepper
1. Cook orzo according to package and add squash at the same to the same pot.
2. Once cooked, drain water, remove from heat and mix in the cheese and the next 6 ingredients. Cover for 5 minutes.
3. Enjoy!
Friday, September 20, 2013
Fall, Baby Fall
Well, it's that time of year again. Does anyone else feel like this year has flown by? Living in Texas I consider it fall when temps. stay in the low 90s and 80s. I also know fall is right around the corner or is here when everyone starts having their babies. Fall is by far, hands down, my favorite cooking season of the year. There's just something a little extra special about the flavors of fall; apples and cinnamon, pumpkin and nutmeg, and so many other warm flavors. Recently I cooked up some sweet baked potatoes for dinner and added, what I think, is the best sweet potato filling. When I first found a similar recipe my husband and I were a little hesitant but intrigued at the same time. I always know when a recipe is a winner when my husband is ready to literally lick his plate clean. This recipe is also what I like to refer to as a "dump" recipe; I go through my fridge, see what kind of veggies are in there and use what I have. So with out further adieu, Chipotle Chicken Southwestern Baked Sweet Potatoes.


What You Need:
1 sweet potato per person
For the Chicken (serves roughly 6):
3/4 lbs Chicken breast
1/4 cup Olive oil
2 tbsp Fresh lime juice
2 Cloves of garlic, minced
1 6 oz can Chipotle chilies in adobo sauce
1 tsp Dried oregano
1 tsp Cumin
Salt and pepper
Potato Stuffing (Personal desired about of each ingredient):
(this can all be varied depending on what you have in your fridge)
Bell pepper, diced
Red or white onion, diced
Chili powder
Paprika
Cumin
Salt
Black Beans, drained
Corn, drained
Jalapeno
Scallions, Cilantro or Green Onion
Cheese
What to Do:
1. Wash and scrub sweet potatoes, dry with towel and wrap in foil. Put potatoes in a crockpot and if you're going to be gone for longer than six hours put temp on low or if you have less that 6 hours put them on high. The microwave works too for faster results.
2. When you're ready to start dinner, in a medium bowl mix olive oil, lime juice, garlic, chipotle peppers in adobo sauce, oregano, cumin, chili powder, and a pinch of salt and pepper. Set aside.
3. In a skillet add a tbsp of oil and heat. Add chicken and flavor with salt and pepper. Once cooked through place on a cutting board and shred. Toss chicken in the chicken sauce and set aside.
4. Drain any juices left in the skillet and return skillet to medium heat. Saute peppers, onions, jalapeno, chili powder, paprika, cumin, and salt.
5. While the veggies are cooking open and drain black beans and corn. Add to skillet and warm.
6. Once all veggie ingredients are warmed, remove chicken from sauce and add to skillet. Turn off heat and cover skillet.
7. Remove sweet potatoes from crockpot and cut as desired. Spoon filling on top of potato and top with scallions, cilantro or green onion, cheese, and sour cream.
8. Enjoy!
Tuesday, September 10, 2013
Date Night In
Around noon on Fridays I usually send my husband a text saying 'in or out?', aka are we going out for dinner or staying in? While I like date nights out, it sure is nice to get creative at home with dinner, find a good movie to rent and pop open a bottle of wine. One of our favorite date night in dinners is pizza. When we first decided it would be fun to make our own pizza I was a little hesitant about the work involved in making pizza dough but after playing with a few recipes, I found what I think is the best base pizza dough EVER!
 What you'll need:
3 1/2 - 4 cups Bread Flour ( you can sub in all-purpose flour but it will be a chewier crust)
1 tsp. Sugar
1 envelope instant dry yeast
2 tsp. Kosher salt
1 1/2 cup water at 110 degrees F
2 tbsp Olive Oil, plus 2 tsp.
What you'll do:
1.Using a stand mixer with a dough hook combine flour, sugar, yeast, and salt.
2. With the mixer running at medium speed, slowly add water and 2 tbsp. olive oil and beat until dough ball forms. The perfect dough ball wont stick to the sides of the bowl or have crumbles in the bottom of the bowl. If the ball sticks to the side, add 1 tbsp of flour at a time until the dough pulls from the side. If there are crumbles in the bottom, it means your dough is to dry so add a tbsp of water at time.
3. Place dough on a lightly floured surface and gently knead into a smooth ball.
4. Coat mixing bowl lightly with 2 tsp of olive oil and place dough back into the bowl. Cover bowl with plastic wrap and a towel and place in a warm area to let rise (I usually place in a non-heated oven) for 1 hour.

5. Remove dough from bowl onto a lightly floured surface and divide into the number of desired pizzas ( we've done 2 and 4). Cover with a towel for roughly 10 more minutes.
6. While the dough has it's last rest, now is the perfect time to place your pizza stone in the oven and start heating the oven to 400 degrees.

7. Roll out dough to desired thickness and shape. Take a fork and poke several holes into the crust. This will help the pizza cook.

8. I would suggest building the pizza on the pizza stone as it can be tricky to transfer a pizza from one surface to another once topped.
9. The amount of toppings placed on the pizza will determine the cook time. Well topped pizzas should take about 30 minutes to bake through and create a yummy, crispy crust. Check the bottom of the crust occasionally and when the bottom is slightly golden it should be good to go!

Note: While the entire process take roughly 1 hr 30 mins. there's only about 20 minutes worth of work.
Note: The above recipe is a base recipe. Add what ever flavors desired. Roughly 3 tbsp. of honey give it a sweet flavor and 2-3 tbsp of Italian seasoning gives the crust a very fresh herb taste.
![]()
 What you'll need:
 3 1/2 - 4 cups Bread Flour ( you can sub in all-purpose flour but it will be a chewier crust)
1 tsp. Sugar
1 envelope instant dry yeast
2 tsp. Kosher salt
1 1/2 cup water at 110 degrees F
2 tbsp Olive Oil, plus 2 tsp.
What you'll do:
1.Using a stand mixer with a dough hook combine flour, sugar, yeast, and salt.
2. With the mixer running at medium speed, slowly add water and 2 tbsp. olive oil and beat until dough ball forms. The perfect dough ball wont stick to the sides of the bowl or have crumbles in the bottom of the bowl. If the ball sticks to the side, add 1 tbsp of flour at a time until the dough pulls from the side. If there are crumbles in the bottom, it means your dough is to dry so add a tbsp of water at time.
3. Place dough on a lightly floured surface and gently knead into a smooth ball.
4. Coat mixing bowl lightly with 2 tsp of olive oil and place dough back into the bowl. Cover bowl with plastic wrap and a towel and place in a warm area to let rise (I usually place in a non-heated oven) for 1 hour.

5. Remove dough from bowl onto a lightly floured surface and divide into the number of desired pizzas ( we've done 2 and 4). Cover with a towel for roughly 10 more minutes.
6. While the dough has it's last rest, now is the perfect time to place your pizza stone in the oven and start heating the oven to 400 degrees.

7. Roll out dough to desired thickness and shape. Take a fork and poke several holes into the crust. This will help the pizza cook.

8. I would suggest building the pizza on the pizza stone as it can be tricky to transfer a pizza from one surface to another once topped.
9. The amount of toppings placed on the pizza will determine the cook time. Well topped pizzas should take about 30 minutes to bake through and create a yummy, crispy crust. Check the bottom of the crust occasionally and when the bottom is slightly golden it should be good to go!

Note: While the entire process take roughly 1 hr 30 mins. there's only about 20 minutes worth of work.
Note: The above recipe is a base recipe. Add what ever flavors desired. Roughly 3 tbsp. of honey give it a sweet flavor and 2-3 tbsp of Italian seasoning gives the crust a very fresh herb taste.
Friday, August 23, 2013
Dinner Challenge #2
With summer winding down and a lot of fruits at the peak of the season I decided I'd try a healthy summery salad from EatingWell for our dinner challenge this week. I don't know about you but I love cooking and eating seasonal flavors. This salad almost made me wish I had another month of summer but I have to say I'm ready for some cooler weather and hearty warm dishes the fall always seems to offer.
 Raspberry, Avocado & Mango Salad
 Raspberry, Avocado & Mango Salad
EatingWell Magazine
1 1/2 cups fresh raspberries
1/4 cup extra-virgin olive oil
1/4 cup red-wine vinegar
1 small clove garlic, chopped
1/4 teaspoon kosher salt
pinch of ground pepper
Salad greens
1 ripe mango diced
1 avocado, diced
1/2 cup thinly sliced red onion
1/4 cup nuts
1. Dressing: puree 1/2 cup raspberries, oil, vinegar, garlic, salt and pepper in blender until well combine
2. Salad: Mix together salad greens, avocado, mango and onion. Toss with dressing and top with raspberries and nuts.
Thursday, August 22, 2013
Lake Treats
When I think of summer I think of going to the lake. Most would say they think of going to the beach but not me and my family. Dinners at the lake are usually simple and nothing fussy, I mean who wants to get off the boat after a long day on the lake and go home to cook a complicated meal. I'm usually charged with bringing dessert. In purging my seasonal recipe binder I found an incredibly perfect Tequila Lime Bar which I have now changed up and call it a Margarita bar (you'll see why shortly).


Margarita Bars
3/4 cup unsalted butter, room temperature
1/3 cup dark brown sugar
1/3 cup granulated sugar
2 cups all-purpose flour
1 cup pecans (or any nut), chopped
2 (8oz) pkg. cream cheese, room temperature
1/2 cup granulated sugar
2 eggs
1 tsp. vanilla extract
3 tbsp. GOOD tequila
2 tbsp. fresh lime juice
2 tbsp. grated lime zest
1 tbsp. cornstarch
1. Heat oven to 350 degrees
2. In a large bowl, beat butter till creamy, add sugars and beat till well combine.
3. On low speed, add flour to mixer and beat till just mixed. Fold in pecans.
4. Press mixture into the bottom of a 13x9 inch non-stick baking dish.
5. Bake for 10 minutes and let cool slightly while making the filling.
6. In a large bowl, beat cream cheese and sugar till well combine.
7. Add eggs one at a time and beat well, add vanilla extract, beat, add tequila, lime juice, and zest, beat well. Add cornstarch and beat well.
8. Add topping over crust. Bake at 350 for 20 minutes. Cool slightly and refrigerate.
I like adding a dollop of cool whip and berries when serving.
YUM!
Monday, August 19, 2013
Another Year Wiser
My sweet husband had his birthday this past week and we have been celebrating all week long. On top of his birthday we had our one year wedding anniversary (yes, I purposely planned it that way)! Since we had already planned on going out to dinner a couple of times last week for multiple celebrations, he elected to have a nice home cooked meal and desert on his birthday. As usual, my first question was "what would you like for me to make you for desert?" He quickly replied without hesitation,"sopapillas!" I naturally then assumed we would be have a Mexican dinner however I was so very wrong,"Pasta!" flew from his mouth as I asked about the main dish. After I assured that he wanted pasta for dinner and sopapillas for desert I quickly wondered how old my husband really was, but the man wants what he wants so who am I to deny him.
A little nervous knowing I was going to have to figure out how to make sopapillas I started researching to find the best ideas and tips. The last time I fried something in oil I started a kitchen fire!Lucky for me I know how to put out a grease fire! Much to my surprise, my sopapillas came out lite, fluffy and delicious and I can wait for you to try them at home!
 Sopapillas
A little nervous knowing I was going to have to figure out how to make sopapillas I started researching to find the best ideas and tips. The last time I fried something in oil I started a kitchen fire!Lucky for me I know how to put out a grease fire! Much to my surprise, my sopapillas came out lite, fluffy and delicious and I can wait for you to try them at home!
 Sopapillas
Makes 12 Squares
4 c. All-Purpose Flour
1 1/4 tsp. Salt
3 tsp. Baking Powder
3 tbsp. Sugar plus extra for serving
2 tbsp. Shortening
1 1/4 c. milk
Peanut Oil
Cinnamon (optional)
Honey (optional)
Cinnamon (optional)
Honey (optional)
1. Sift 4 cups all purpose flour, measure and sift again with salt, baking powder and sugar. If you packed you flour before the first sift, there will be extra flour for the second sift.
2. Cut in shortening (use a dough/ pastry blender or take two butter knives and in a crossing motion cut dough into flour mixture).
3. Slowly add milk into dough, mixing by hand while adding milk. You want to add just enough milk so that the dough pulls away from the bowl ad everything is mixed.
4. Cover dough and set aside for as much time as you have. The longer it sits, the fluffier the dough will be after frying.
5. In a nonreactive pot (porcelain pot) pour oil at least an inch deep. Using a candy thermometer heat to 375 degrees.
6. While the oil heats, on a floured surface, roll out dough roughly and quarter of an inch thick and cut into desired shapes.
7. One at a time add dough to oil. If you add to much to fast, you can cool the oil and affect the turnout of the sopapilla.
8. As the dough browns on one side, flip and brown the other.
9. Remove from oil and dry on a paper towel
10. Coat with sugar, cinnamon and honey to serve!
9. Remove from oil and dry on a paper towel
10. Coat with sugar, cinnamon and honey to serve!
Monday, August 12, 2013
Monday Funday!
This past Saturday marked the end of my hosting showers season! Its been great fun but I'm ready to spend my time focusing on other subjects, such as re-doing my back yard. Here are a couple of pictures taken before everyone arrived:




Gender Reveal Shower

I always enjoy coming up with food items to serve at parties, trying to find something new and creative. At the last shower I definitely found a keeper! I'm an avid reader of Southern Living Magazine and always love trying their cakes. For the last shower I threw I made their Luscious Lemon Cake which can be found here and did a variation of their Luscious Lemon Frosting. I find it important in a frosting to make sure the flavors are strong since a lot of the time a flavor ends up being more subtle than intended in the cake. There are several of my family members who do not like icing on cakes that ended up LOVING this butter cream which means it will be the ONLY butter cream base I will ever use again, for now!

Yields enough frosting for 24 cupcakes
2 cups butter, room temperature
1 tbsp lemon zest
1/2 cup fresh lemon juice
1 (32 oz.) pkg. powered sugar
1. Beat butters until creamy. It is very important that the butter be room temperature for the correct consistency.
2. Mix in lemon zest and gradually pour in lemon juice so that it has time to mix together.
3.Gradually beat in powdered sugar.
Subscribe to:
Posts (Atom)