This week I have seen so many Christmas light crews going in and out of my neighborhood and everywhere. Like so many other people, I love this time of the year. Truly! Christmas carols start popping up in my head, I start present shopping along with so many other fun things. However, is Thanksgiving slowly being forgotten about? Besides the shopping centers that put up their Christmas stuff in early October, on a run around the neighborhood the other night I counted numerous houses that already had their Christmas lights turned on, garland around the doors and staircases and Christmas trees up! Did I miss something? Thanksgiving for me is a time to be with family and celebrate the fact that we have all that we have been blessed with and celebrate those blessings with one another. It is the beginning of a month of gratefulness and selflessness. Maybe it's just me, maybe I'm old school with my firm belief in nothing goes up till after Thanksgiving. Anyway, rant done!
Showing posts with label DIY. Show all posts
Showing posts with label DIY. Show all posts
Tuesday, November 19, 2013
Tuesday, October 29, 2013
How to be nice during Halloween
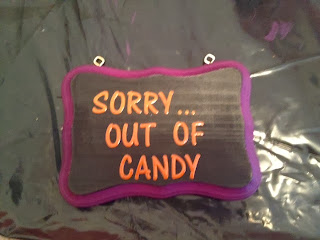
Awhile back I may have mentioned to you that I had to create a list by week for projects I wanted to complete this fall season. This past week I found myself making one that I wasn't planning on making. However, I love it! I have started to get more excited about Halloween, not only because it is the kick off to my favorite two months of the year, but because it seems that everyone else is getting excited about it too. Unfortunately for me, I believe there is an age and time limit. Last year around 8:30 we had a knock on our door and saw that it was a group of teenagers coming around for candy. Number 1, it's 8:30 on a week night, I'm preparing for the next day, thus, among other reasons, why parents bring their kids around early. Number 2, if you can drive a car, you're to old to be trick or treating. I know some people believe that is too old but that is pretty much my age limit. So, at 8 o'clock this year, I'll be putting up my handy dandy little sign.

What you'll need:
Wood Plaque (can be found at crafts stores)
sand paper (optional)
craft paint
paint brush
hot glue gun
ribbon
2 eye hooks
letter stickers
decorations (optional)
How to make it:
1. Usually wood plaques are sanded down nicely and don't need any extra sanding. Take a look at your edges and see if yours needs any extra sanding for smoothness.
2. Paint your plaque. If you're using a color combo like mine, it's important to paint your outer edges first and top with the black after.


7. So that edges don't hang over once the ribbon is glued together, cut ribbon as shown above. Glue together.

8. Add a little extra flare to your sign by adding some scrapbook stickers or a witches hat to the corner.

What you'll need:
Wood Plaque (can be found at crafts stores)
sand paper (optional)
craft paint
paint brush
hot glue gun
ribbon
2 eye hooks
letter stickers
decorations (optional)
How to make it:
1. Usually wood plaques are sanded down nicely and don't need any extra sanding. Take a look at your edges and see if yours needs any extra sanding for smoothness.
2. Paint your plaque. If you're using a color combo like mine, it's important to paint your outer edges first and top with the black after.

3. Add your eye hooks. I used small ones that I was able to screw in by hand.
4. If you don't have a fancy machine or great hand writing to make those perfect letters, letter stickers are a great option. Cut out your stickers and make sure they fit the way you want on your plaque. Place letters on your plaque.


5. I decided mine needed a little something after sorry so using a fine tip brush and a little orange paint I added three dots.

6. Run your ribbon through your eye hook.


8. Add a little extra flare to your sign by adding some scrapbook stickers or a witches hat to the corner.
Tuesday, October 8, 2013
It just needed a facelift....
A few months ago I was over at my mother-in-laws house shuffling through some stuff with her in the garage. She has a lot of stuff and at the time she had more stuff in her garage because my sister-in-law, her husband and 3 babies were living with her while their house was being built. It's always fun going over there to see what's new and what creative project she's currently working on. While we finished up searching for whatever we were searching for in the garage that day she pointed to 2 lamps she had sitting on the golf cart and asked it I wanted them. I knew exactly where they would go but knew they were not going there in the condition they were in, not that they were bad just not my style. Spray paint has become my friend! With a little love and creativity I re-vamped these beauties to work perfectly in my decoration deprived bedroom.
Thursday, October 3, 2013
DIY Halloween Wreath
I use to not really care about Halloween. Honestly, why would I? I'm to old to go trick or treating, don't have any kids and until we moved into our neighborhood I use to roll my eyes at those crazy apartment neighbors who would decorate for the ghoulish occasion. However, last October that all changed and I couldn't wait for the kids to come by our new home and pass out candy. Not surprisingly, I completely over bought and over paid for candy (this year, hello dollar store!), didn't realize that you should turn your outdoor lights on or even better, just stand outside, and definitely didn't have anything fun and friendly to show my "holiday" spirit. This year I'm actually going to add some Halloween decorations to my yearly fall decor and I'm very excited to post my first craft to my blog!


Halloween Wreath

I will say while it's a decent picture of the wreath, It's so much better in person!
What You'll Need:
Grapevine Twig Wreath
Black Spray Paint
Glitter Spray Paint (optional)
Hot Glue Gun
Spooky Little Trinkets for Your Wreath
Step 1: Find a grapevine twig wreath. I found mine at JoAnn's for regular price $12 (always use a coupon to make it cheaper!)

Step 2: I laid some old newspaper down to prepare for spray painting. Using a flat black spray paint, paint the wreath from several different angles to make sure its completely covered and let dry.

Step 3: Using Krylon's Glitter Blast Starry Night (JoAnn's), spray a light layer of glitter to give it a fun 3-dimensional look.

Step 4: Once completely dry, first glue on your words and secondly your spiders (hobby lobby). On the off chance that your trinkets have picks on the, as if to put in floral arrangements, use a pair of pliers to gently pull off, or if needed, cut off.

Step 5: Add a hook to display your wreath for all to see!

Subscribe to:
Posts (Atom)