Friday, November 1, 2013

Fitness Friday #2


Happy Belated Halloween! I hope everyone had fun last night with the little trick-or-treaters. I personally can't say Halloween is over till tonight for me. We have one last Halloween party to attend and I'm sure it's going to be fabulous! At about 8 p.m. last night, after it had been awhile since our last trick-or-treater, my husband and I took our dog out on a walk around the neighborhood to see if anyone was still out going house to house. They were, just not on our street. I started look at the pillow cases and buckets full of candy and noticing how full they were. A little girl told me she had been going since 5:30 that evening. Yikes! I'm sure I was proud of my accomplishment of a bucket load of candy at the age but all I kept thinking about was how tempting it would be to have all of that candy around for even a small period of time.

On occasion when I don't feel like doing a full work out or even leaving the house, I pull up an awesome free website I found for yoga called yogadownload . After seeing all that candy and thinking about all the sugar in the kids bags I felt as though i needed to do a little something before I went to bed. This website has several free yoga workout videos you can follow as well as some that you pay for. During my busy season for work this was a great resource for me to calm down after a long day and bring my blood pressure and sanity levels back down to normal. While I really like this website and it says beginner on several videos, if you've never done yoga before I'd suggest going to a couple of classes and learning the basics so that you can listen to the video to follow along instead of watching the video.

I hope you all have a fabulous first day of November!

Namaste


Disclaimer: The thoughts and opinions are my own and not solicited from the above reviewed.

Tuesday, October 29, 2013

How to be nice during Halloween

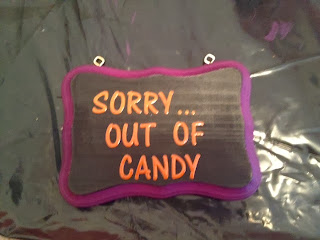
Awhile back I may have mentioned to you that I had to create a list by week for projects I wanted to complete this fall season. This past week I found myself making one that I wasn't planning on making. However, I love it! I have started to get more excited about Halloween, not only because it is the kick off to my favorite two months of the year, but because it seems that everyone else is getting excited about it too. Unfortunately for me, I believe there is an age and time limit. Last year around 8:30 we had a knock on our door and saw that it was a group of teenagers coming around for candy. Number 1, it's 8:30 on a week night, I'm preparing for the next day, thus, among other reasons, why parents bring their kids around early. Number 2, if you can drive a car, you're to old to be trick or treating. I know some people believe that is too old but that is pretty much my age limit. So, at 8 o'clock this year, I'll be putting up my handy dandy little sign.

   
What you'll need:

Wood Plaque (can be found at crafts stores)
sand paper (optional)
craft paint
paint brush
hot glue gun
ribbon
2 eye hooks
letter stickers
decorations (optional)

How to make it:

1. Usually wood plaques are sanded down nicely and don't need any extra sanding. Take a look at your edges and see if yours needs any extra sanding for smoothness.

2. Paint your plaque. If you're using a color combo like mine, it's important to paint your outer edges first and top with the black after.


3. Add your eye hooks. I used small ones that I was able to screw in by hand.
 
 
4. If you don't have a fancy machine or great hand writing to make those perfect letters, letter stickers are a great option. Cut out your stickers and make sure they fit the way you want on your plaque. Place letters on your plaque.


5. I decided mine needed a little something after sorry so using a fine tip brush and a little orange paint I added three dots.
 
 
6. Run your ribbon through your eye hook.


 7. So that edges don't hang over once the ribbon is glued together, cut ribbon as shown above. Glue together.


8. Add a little extra flare to your sign by adding some scrapbook stickers or a witches hat to the corner.


Sunday, October 27, 2013

Veggie Loaded Mac & Cheese

It's squash season! A couple of years ago I was intimidated by these yummy things. It seemed so daunting to cook them much less figure out what to cook them with. Intimidated no more my squashy friend! I love finding ways to cook healthier versions of our favorite dishes. It's also great when its budget friendly! This week I've been playing with my friend, butternut squash, and we have come up with some fabulous yummy dishes!


Have any of yall seen the Bethenny show, hosted by Bethenny Frankle from the Real House Wives of New York? If you haven’t, she started out as a healthy food chef and has now made part of this a segment on her show. Last week she made a "healthy" mac & cheese. WINNER, one of the hubby's favorite dishes! Check it out here. This, of course, made me start thinking about what can I do to jazz it up just a smidge more and make it into a meal. Here is my version of a healthy mac & cheese…


Ingredients:

5 chicken tenders
1/2 cup bell pepper (whatever you have works)
1/2 cup broccoli florets
12 ounces whole wheat mini pasta
1 cup skim milk
1 1/4 cup freshly shredded Parmesan
1 1/2 cup reduced fat sharp cheddar cheese, shredded
1 cup butternut squash puree (don't feel like making it? It's in the freezer isle) (see notes)
1 teaspoon salt plus some for seasoning chicken
1 teaspoon dry mustard
1/2 teaspoon pepper plus some for seasoning chicken
1/2 teaspoon Worcestershire sauce
1/2 tsp chili powder
2 tablespoons whole wheat bread crumbs
Reduced fat Monterey jack cheese, shredded


Directions:

1.       Preheat the oven to 350 degrees. On a baking pan lined with foil, lay out chicken tenders and salt and pepper on the top. Cook in the oven for about 10 minutes or until cooked.

2.        Boil pasta shells in salted water until slightly firm, according to package directions. Once cooked, drain and blanch broccoli florets in the water. Once they turn a bright green they will be cooked. Remove pan from heat, drain and splash broccoli with cool water. Return both pasta and broccoli to the pan  

3.       In another saucepan, combine the skim milk, Parmesan, cheddar, and butternut squash puree over medium heat until melted and combined. Turn off the heat. Add salt, mustard, pepper, Worcestershire sauce, and chili powder.

4.       Using two forks, shred chicken to desired size.

5.        Add cheese sauce, chicken and bell peppers to the pasta and broccoli. Mix together well.

6.       Spray a shallow baking pan with cooking spray and put the pasta-cheese mixture in it. Sprinkle with breadcrumbs and Monterey jack cheese. Bake for 15 to 20 minutes.

 
Notes: For a quick and easy butternut squash puree, see my recipe here.

Saturday, October 26, 2013

Squishy Squash

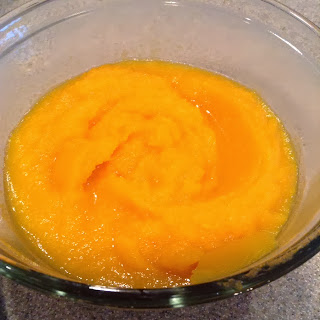
You’re probably thinking 'woohoo butternut squash puree…who cares', right? Well my friend, until you discover the rich, creamy, butter-y-ness this baby has to offer, I suggest you don't knock it till you try it! After looking at a couple of recipes on how "chefs" make it and noticing it took an hour to make I realized a) oh yea, you technically have and hour to make it since this is your job and b) what normal person has 1 hour available to make a puree? Not me! Off on my lonesome I went on a journey to find something suitable for the modern everyday women/ man. Here's what I found…


1.       Peel your squash and cut it down the center. Clean out its guts. Depending on the size (I usually get the smallest one I can find) and how much you need, generally half of a squash will be sufficient for puree. Save the rest for a yummy side dish!


2.       Cube your squash into about 1 inch cubes or something that will fit in your blender or food processor.

3.       Place your squash in a blender or food processor and chop/ puree. Using the puree button on my blender very finely shredded by squash (see below).
 

4.      In a skillet on medium heat, cook your squash with roughly 3/4 cups of water this should take 5- 10 minutes. Cover with a lid and stir occasionally. Use your judgment on how much water the squash needs. Your squash is cooked when it starts getting a mushy texture.


5.     Return Squash to blender/ processor and puree until there are no more chunks. There you have it, butternut squash puree in under 20 minutes!


P.S. This is freezer friendly recipe if you decided to make it in bulk.
P.S.S. Adding a little cinnamon, nutmeg and butter would make this a lovely side dish.